the sweet scallops tote pattern
You asked for it, you got it! A FREE PATTERN from the studio of see kate sew! Hot off the press!
 I'm so thrilled with this cute little tote. It's just so happy.


 Materials:
1/2 yard home decor weight fabric
1/2 yard quilting weight cotton for lining
1/4 yard of 7 different quilting weight prints or solids
free pattern pieces
make the scallops
Let's start with the fun part! For the scallops, raid your fabric stash for 7 prints and/or solids that look good together. Then print out the free pattern pieces. Cut out the scallop pieces and tape them together along the dotted line.


 Sew the bottom edge at 1/4." Leave the straight top part open.


 Now stack your scallops. The scallop pieces is longer than the bag's front, so you can vary the placement back and forth.
 Arrange them kinda like this:


 Like this!
 Top stitch the very top one at about 1/8".


 Sew all the way around the outsides of the lining and outer pieces, leaving a 4" hole at the bottom of the lining.


Press the opening closed and stitch it up.
 Now your bag is finished! We just need to add the handles!


 Fold it in half like this. Pin in place.

 Topstitch both sides all the way up.
 Fold over the bottom edge about 2" and pin onto your bag, about 2" in from the sides.
 Sew a square around the end of the handle and repeat for the other side.
 That's it you're done!


This is a great project for indecisive fabric chooser (like me!). You get to use up to 9 different prints!
sweet scallops tote instructions

1/2 yard home decor weight fabric
1/2 yard quilting weight cotton for lining
1/4 yard of 7 different quilting weight prints or solids
free pattern pieces
make the scallops
Let's start with the fun part! For the scallops, raid your fabric stash for 7 prints and/or solids that look good together. Then print out the free pattern pieces. Cut out the scallop pieces and tape them together along the dotted line.


Cut out TWO scallop chains of each print.


Pin together, right sides together.


Clip and notch the curves to get rid of some of the bulk.

Then turn and press.


Make six more of these...


Now we'll sew them to the front of your bag. Cut out two exterior and two lining pieces using the guide on your pattern pieces. Grab one of the exterior pieces.

Optional: Sew a little strip of fabric to the bottom of your bag. This will add another pop of color where the scallops don't cover. If you want the exterior fabric to show through, you can skip this part.


For the top piece, press under 1/2" and pin about 4 inches below the top of the bag. I didn't pin all the scallops down until I was happy with the placement.


Now pin them to the bag at the top of each scallop to preserve your placement.

Lift the top ones up and sew, starting at the bottom. Zig zag stitch all the way across the top of each scallop piece.


Now turn your piece over and trim the edges of the scallops to line up with the bag.


assemble bag
Lay your lining piece on top of the front piece, with right sides together. Sew it at 3/8".

Press the seam allowance toward the lining and stitch on the top of the lining at 1/8".


Repeat for the back. Then stack the two pieces together, right sides together and pin all the way around.


Turn right side out and press.

Press the opening closed and stitch it up.


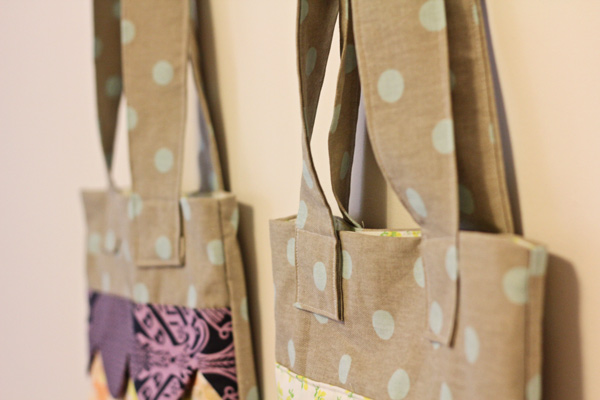
handles
Cut out your handle pieces based on the cutting guide in your pattern piece file. Fold over and press 1/2" on each long edge of the strap. Then press in half.


So what do you think? Do you love it? Think you can do it?
cute banget yaaa ?? hehehe .. ngilerrr ih pengen bikin sendiriii :)
ini aku re-post dari see kate sew loh :)
Tidak ada komentar:
Posting Komentar